How to Send an Email in C# using gmail

Send an Email

It is becoming common these days to send an email from your application to specific list of users. Usually this is to notify users or administrators of certain action happened. As example of this, Notify administrator if an error happened in certain module, or notifying manager to approve/decline a request.

Thankfully, sending emails from .net applications (desktop or web) is becoming easy task to accomplish. Here is a sample code that utilizing gmail smtp to send an email. You can use the same steps to send email from outlook.com or office365.com, you will need to change the configurations in emailSettingInfo object

public void SendEmail()
{
    string sender, recipient, ccList, bccList, smtpSenderPassword;
    //Prepare SMTP Setting
    var emailSettingInfo = new
    {
        SmtpSenderEmail = "<<Sending Email Address Goes here>>",
        SmtpSenderPassword = "<<Sending Email Password Goes here>>",
        SmtpClientHost = "smtp.gmail.com",
        SmtpPortNumber = 587,
        SmtpEnableSsl = true
    };

    //Get the Email body ready
    var emailInfo  = new {
        ToEmailAddress = "<<Your email goes here>>",
        Subject = "Send Email from C# Code",
        Body = "Hi, this is a test email",
        CcEmailAddress = "<<CC List>>",
        BccEmailAddress = "<<Bcc List>>",
    };

    sender = emailSettingInfo.SmtpSenderEmail;
    recipient = emailInfo.ToEmailAddress;
    smtpSenderPassword = emailSettingInfo.SmtpSenderPassword;

    //Intialise Parameters  
    SmtpClient client = new SmtpClient(emailSettingInfo.SmtpClientHost);
    client.Port = emailSettingInfo.SmtpPortNumber;
    client.DeliveryMethod = System.Net.Mail.SmtpDeliveryMethod.Network;
    client.UseDefaultCredentials = false;
    System.Net.NetworkCredential credentials = new System.Net.NetworkCredential(sender, smtpSenderPassword);
    client.EnableSsl = emailSettingInfo.SmtpEnableSsl;
    client.Credentials = credentials;
    try
    {
        var mail = new System.Net.Mail.MailMessage(sender.Trim(), recipient.Trim());

        mail.Subject = emailInfo.Subject;
        mail.Body = emailInfo.Body;
        mail.IsBodyHtml = true;
        if (!string.IsNullOrEmpty(emailInfo.CcEmailAddress ))
        {
            ccList = emailInfo.CcEmailAddress;
            foreach (var email in ccList.Split(";".ToArray()))
            {
                mail.CC.Add(new MailAddress(email));
            }
        }

        if (!string.IsNullOrEmpty(emailInfo.BccEmailAddress ))
        {
            bccList = emailInfo.BccEmailAddress;
            foreach (var email in bccList.Split(";".ToArray()))
            {
                mail.Bcc.Add(new MailAddress(email));
            }
        }

        client.SendCompleted += (s, e) => {
            client.Dispose();
            mail.Dispose();
        };

        client.Send(mail);//send the email
                
    }
    catch (Exception ex)
    {
        //Do Erorr Handling logic
    }
}

How to solve Access-Control-Allow-Origin

When you are trying to do an http post from your Jquery, Angular or any client side script language to an web API that has a different domain name as yours, you will be getting error on the web browser that says:

No ‘Access-Control-Allow-Origin’ header is present on the requested resource. Origin ‘null’ is therefore not allowed access.

This is happening because the website and web API has a different domain names. solving this issue can be done using the following steps:

  1. On the wbe API project, Right click References and select “Manage Nuget”
  2. Search for “Cors” and install “Microsoft.AspNet.WebApi.Cors” , this will install a new dll to your project; System.Web.Http.Cors
  3. go to App_Start/WebApiConfig.cs file
  4. Add using statement  to include System.Web.Http.Cors
  5. On Register method, add the following 2 lines
    var cors = new EnableCorsAttribute("*", "*", "*");
    config.EnableCors(cors);

    the EnableCorsAttribute has the following parameters:

Origins:  Comma-separated list of origins that are allowed to access the resource. Use “*” to allow all.
Headers: Comma-separated list of headers that are supported by the resource. Use “*” to allow all. Use null or empty string to allow none.
Methods: Comma-separated list of methods that are supported by the resource. Use “*”  to allow all. Use null or empty string to allow none.

How to use Log4Net C# application

log4net logo

Introduction:

Log4Net is library that you can use to manage data logging into flat files. The Log data might vary from informative messages, Diagnostics messages to Error messages and will help in debugging and troubleshooting issues on the application without the need to debug the code line by line. The main purpose of this post is to show the minimum changes that developer needs to do in order to use Log4Net library.

You can find the Log4net library’s code on github under the following url https://github.com/apache/log4net

How to Install in .Net application:

1. Get the needed references in your project

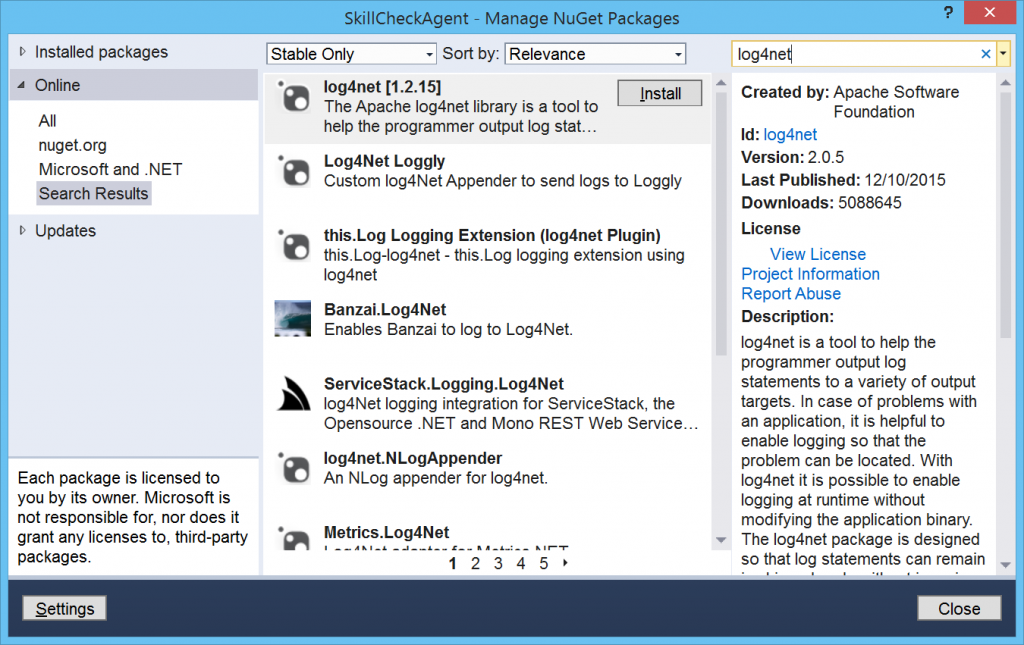
The first step to use log4net library is to add the right reference to your solution/project. in order to do that, Right click the solution project that you will use the library on it, and choose “Manage NuGet Packages” from the menu. This will show a new popup to search libraries.. Search for “Log4Net” then click on Install button as in below image

This will add Log4Net dll reference to your project references.

2. Assembly.Info changes

under the selected project, choose properties node and expand it. open assembly.info file and add the following line.

[assembly: log4net.Config.XmlConfigurator(Watch = true)]

This line of code will tell Log4Net to be watching the xml configuration.

3. Adding the needed configuration to app.config or web.config file:

Open the configuration file and add the following line under the <configSections> tag

<section name="log4net" type="log4net.Config.Log4NetConfigurationSectionHandler, log4net" />


Add the following XML tag at the end of the config file but before the configuration closing tag  </configuration>

<log4net debug="true">
	<appender name="RollingFileConfig" type="log4net.Appender.RollingFileAppender">
		<file value="C:\\LogFolder\\Log.txt" />
		<appendToFile value="true" />
		<rollingStyle value="Size" />
		<maxSizeRollBackups value="1000" />
		<maximumFileSize value="1KB" />
		<staticLogFileName value="true" />
		<layout type="log4net.Layout.PatternLayout">
			<conversionPattern value="%-5p %d %5rms %-22.22c{1} %-18.18M - %m%n" />
		</layout>
	</appender>
 
	<root>
		<level value="ERROR" />
	</root>
	<logger name="Exceptions">
		<level value="ERROR" />
		<appender-ref ref="RollingFileConfig" />
	</logger>
</log4net>

5. Log Messages from your code:

Logging messages from the code is one line of code as below:

LogManager.GetLogger("Exceptions").Error("Information to Log Goes here!");

the parameter that is passed to GetLogger function is the same Logger name on the config file. so basically you are telling the log4net to log an exception category with level Error to file

SignalR App Considerations and Constratints

SignalR Image

Before start considering SingalR to solve your business problem, you need to make sure that you have the right environment. Signal R can’t be installed in all .net environment as it has minimum requirements… below is the constraints that you have when developing SingalR applicaiotns:

1. Operating System Constraints:

SingalR applications can be installed on the followings operating systems:

    • Windows Server 2012
    • Windows Server 2008 R2
    • Windows 8 and Windows 8.1
    • Windows 7
    • Windows 10
    • Windows Azure.


2. .Net Framework Constraints:

You need to develop your SingalR application using .net 4.5+


3. IIS Constraints:

SingalR app needs to be hosted on the followings IIS versions

  • IIS 8
  • IIS 8 Express
  • IIS7 Support for extensionless URLsis required
  • IIS 7.5 Support for extensionless URLsis required
  • IIS application pool needs to be running in the integrated mode. Classic mode is not supported.


4. Client Side Scripting Constraints:

Web applications that SignalR communicating with needs to have JQuery version 1.6.4 or greater.


5. Web Browsers Constraints:

SignalR can be used with variety of web browsers, but typically only the latest 2 versions are supported.

The following is the list of web browsers that supported by SignalR at the time of writing this post:

  • Microsoft Internet Explorer versions 8, 9, 10, and 11. Modern, Desktop, and Mobile versions are supported.
  • Mozilla Firefox: for both Windows and Mac versions.
  • Google Chrome: for both Windows and Mac versions.
  • Safari: for both Mac and iOS versions.
  • Opera: for Windows only.
  • Android browser


What is .Net Extension Method

.Net Extension Method is one of a nice features introduced with .Net 3.0. It allows developers to add new functionalities to existing data types without having a need to inherit from these types or compile old code. For example, if you are encrypting and decrypting strings in your application, wouldn’t it nice to have a code like below
StringObject.Encrypt();
In the tradition way, we used to create a static helper method that we call and pass string to it as a parameter:

public static string Encrypt(string input)
{
//….Logic goes here
return encyptedValue;
}

Implementing Extension Methods is very easy.. All what you need to do is to create a static class and have your extension method as static method and use this keyword on the parameter list.. Below is a sample code

public static class MyExtensions {
public static string Encrypt(this string input) {
//….Logic goes here
return encyptedValue;
}
}

Note the “this” keyword that is being used on the parameter.. this what make this .Net Extension Method. You can call this method in 2 ways:
1. As extension method, str.Encrypt();
2. As regular method: MyExtensionClass.Encrypt(str);
Both syntax are equivalent to each other but the first one is less code.

Error during serialization or deserialization using the JSON JavaScriptSerializer

Error during serialization or deserialization using the JSON JavaScriptSerializer. The length of the string exceeds the value set on the maxJsonLength property.

You should expecting the above error message in case you are trying to do an ajax call for a method that is returning large amount of data in JSON format. This is happening in case the size of JSON data exceeding the default maxJsonLength value for the JavaScriptSerializer. The good news is that this value is configurable and you can adjusted as needed.

  • Note:JavaScriptSerializer is a class that you can use to JSON serialize and de-serialize data in easy way.

Solving this issue require to write some code to change the default the size of maxJsonLength property’s value and inform the JSON serializer that this is a large size object. to do so, you will need to do something similar to below code snippet

public JsonResult GetLargeJson()
 {
      var response = GetLargeDataFromDataSource();
      //To handler large data results.
      jsonResultObj = new JsonResult();
      jsonResultObj.Data = response;
      jsonResultObj.MaxJsonLength = Int32.MaxValue;
      jsonResultObj.ContentType = "application/json";
 
      return jsonResultObj;
  }

Introduction to SignalR

signalr

What is ASP.Net SignalR

SignalR is a Technology that enable Real-Time messages/contents to be pushed from server to connected web clients without the need to refresh the web pages every specific period of time. In the old days, we used to have schedule timer on client side to request new data from server every specific period of time to update client UI with the new data. with SignalR this is no more the case.

Microsoft published a specific library for developers to enable them to add real-time functionlaities to asp.net web application . It is worth to mention here that SignalR is an open source project  an you can check the source code on GitHub.

Also SignalR supporting Scale out to thousands of clients using Service Bus, SQL Server or Redis. This enable SignalR to work seamlessly in  Web Farm or Web Garden environments with no issues to mention.

SignalR Usage Examples:

Chat applications over web is a great example of the usage of SignalR, Auto update client screens with currency exchange rates where user will get live updates with currency exchange rates as it is got changed

SignalR Communication Models:

There is 2 ways of communication models between Server and Clients using SignalR; Persistent Connections and Hubs

1. Persistent Connections:  A Connection represents a simple endpoint for sending single-recipient, or broadcast messages. The Persistent Connection enables the developer to have a direct access to the low-level communication protocol that SignalR exposes.
for those who worked with connection-based APIs in Windows Communication Foundation WCF, will be easily getting familiar with this model.
2. Hubs: is a more high-level that is built on top of connection API and allow server and clients to be able to call methods on each other directly and seamlessly. It is SignalR responsibility to handles the dispatching messages over the internet; SignalR MAGIC!
For those who use Remote Invocation APIs such as .NET Remoting will be getting familair with this model easily.

The Hub Communication model is suitable for most of the applications needs. For me I never get into a case where I have to use Persistent connection model, and I always go to Hubs model.

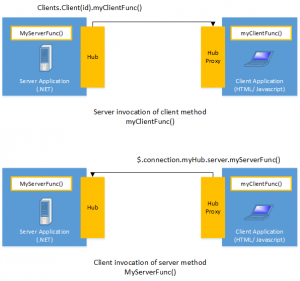
One of the Diagram that make it easy to understand the SignalR magic that I copied from www.asp.net site is the below one.. where it is showing that client can call server method easily and server can call a method on web client with no issues. This wasn’t possible without SignalR

what_is_signalr_invocation


Optimize Orchard Setup on Shared Hosting

In the past few days I was trying to setup Orchard on Godaddy shared hosting server. The steps that I follow was:

  1. Download Orchard CMS source code from the following link http://www.orchardproject.net/download   On this page, there is multiple options to download, I downloaded the one with Source Code as I’m interesting to look into Orchard code as well. but you can download the zip file which has no code. if you decided to download the zip file, then you can skip point 2
  2. Extract the source code zip file and open the solution in Visual Studio.. then publish the solution to your local drive.
  3. upload the published version to your shared hosting provide such as GoDaddy
  4. for the first time you access your website Orchard will compiling the code and building dependencies folder under App_Data.. so you need to make sure the App_Data folder has the proper permission for IIS user to write into that folder.
  5. once Orchard finish compiling the code, you will get into Setup page where you enter the site name and database information.
  6. after finishing the setup form, Orchard will start doing some internal stuff to add database tables.
  7. Once it done. you will get logged into Orchard dashboard. there you can manage Orchard CMS.
  8. Go to Module link and search for a module called “Keep Alive” install it. then enable it. this module will keep the IIS process working on Orchard website thus make it always alive and get rid of the worming up time.

Enlarge the Font Size on Visual Studio

VisualStudio

I was using Visual Studio 2013/2015 on small screen. The main issue that I was facing is the small font size for solution explorer and menu items. That was the main issue that I’m facing of using small screen. Thankfully there is a way to enlarge the font size for menu items and solution explorer.. to do so, follow these steps:

1. From tools menu, select Options

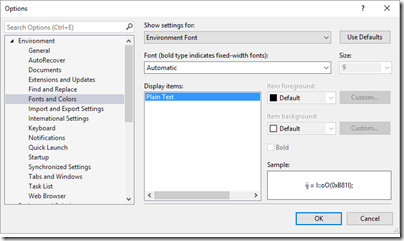
2. On the left hand size, choose “Fonts and Colors” and on the right hand side section of this, under “Show settings for” choose “Environment Font”

VS2013OptionsPopup

3. On “Font (bold type indicates fixed-width fonts) “ drop down list, change Arial font type or whatever font type you would like to have

4. And under “Size” drop down list choose the proper font size that you feel comfortable with.

5. Hit “OK” on the popup..

Hope that would help having a better development experience.

What is Windows Universal Apps – in Short

Universal Apps in short is an application model that Microsoft invented for applications that is being served in Windows Store. This enabled the application to be served in both Windows Store and Windows Phone Store. It is not a really universal application cross all platform, but it is universal in Windows world only but this application model brought the ability for developers to target all windows 8/8.1 devises while using the same code over and over; this include windows phones, tablets and PCs..What enabled this is having the Windows Common Runttime; the universal apps  is being built on top of this new runtime which is already there for different windows platforms.

if you are interesting to know more about what is the universal apps, I’m planning to write more articles about it but if you can’t wait, I advise you to read this article on this link.